How To Make A Fearless Mother's Day Card -Free SVG Included
I’m constantly finding ways to maximize the use of my cutting machine. Print and cut is one of those features I really don’t use that often. Perhaps this is because I associate print and cut with sticker making and leave it at that. Today, I’m using print and cut to make a Mother’s Day card.
I teamed up with Kasey from Pen + Posh to bring you this fabulous fearless mother print and cut card. With the beautiful watercolor look of this design, it was hard to only make one project. Kasey is doing something really special this time and offering 3 different versions of this file. Since a watercolor can not be made into an svg file, Kasey gives us the png file that I’m using in this tutorial. She is graciously giving us a simplified version with the paint mark as one complete color so it can be an svg and then also a file without the paint mark.

I’ll start off in the page set up panel, I turn on the print border and the cut border to make sure everything will be lined up correctly. I’m also making my media size 8.5 x 11 inches which is my standard printer size. Toggle over to the registration marks and turn those on as well. Here is where I’m able to customize the print and cut area. I raise up the bottom inset to make sure it is within my print border. The rest of the insets I make as small as possible to maximize my cutting area.

Now that our page is all set up, it is time to work on the design. As I mentioned before, I’m using the png file so it will only cut around the border. I’m going to size that down to around 5 inches.
Next, I grab the rectangle tool and draw out the two halves of my card. Each box is 5.5 inches wide and 4.25 inches tall. I make one box and then replicate it below. This gives them a shared edge.

Now I grab the design and center it in the bottom box. After that, I nudge the top box down by one arrow key to make the boxes overlap. Having a shared line isn’t enough overlap to combine them. Once they are overlapping, I use the weld function to turn the two boxes into one large box.

I’m in the home stretch design-wise. It is time to add the scoreline. I grab the line segment tool and while holding down the shift key to keep the line straight, I draw out a line. Using the size tool up top, I punch in 5.5 inches because this is the width of the card. Now the scoreline will be the exact width of the card. Again, I use the center button to horizontal and vertically align the scoreline to the center of the card.

The last bit of prep work is to recolor some of the lines. I change the scoreline to blue and the line around the design to purple. Before hitting the print button, I like to double-check that my registration marks are within the gray print border and that my card is all ready. Once the design is printed, you don’t want to make any more adjustments to the screen or it could mess up the cut
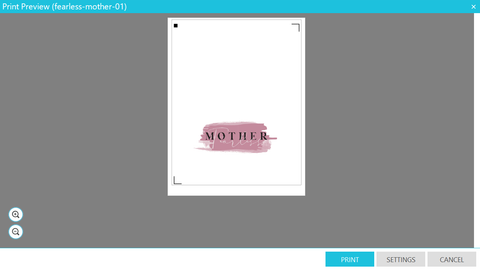
It is time to send our work to the printer. You’ll notice on the print preview that only the design shows up along with the registration marks. This is exactly what we want. None of the cut lines should be visible.
With the paper printed, it is time to place it on the cutting mat. The square should be placed on the top right corner of the cutting mat closest to the cut blade, as shown on the screen.

On the send panel, I’m going to cut by the line color. That is why I changed the colors of the scoreline and the outline of the graphic. I’m using a Silhouette Cameo 2 which has the ratchet blade. I’m turning off the purple line around the graphic, I don’t want to cut that. I’m going to cut the red line which is the outline of the card, then I’m adding a pause. This gives me time to manually adjust the cut settings on my blade before I score. I’m turning the blue line to score. Once the send panel is set up it is time to start cutting.

I load my mat into the cutting machine and hit send. First, it will read the registration marks, those are the three black marks on the edge of the paper. Then it will start cutting. After it is done cutting the machine will stop, allowing me time to make my adjustments to the blade. Then I hit resume and the machine will score.
All that is left now is to remove the mat, peel off the card and fold it down the scoreline. If you want to get super fancy you can flip the card open, put it back into your cutting machine and use the sketch pens to write a sentiment on the inside.
That’s it, in under ten minutes I was able to make a stunning print and cut Mother’s Day card using Pen and Posh’s fearless mother design.

 For more from Christie, check out her website, Crafty Christie’s Creations, she specializes in handmade greeting cards, and DIY paper crafts. She is an EXPERT in Silhouette Studio, which has also led her to start producing tutorials to make all this crafting a bit easier. Follow her on Instagram @craftychristiescreations for more fun craft projects and tips!
To grab these free designs from some of my other favorite bloggers, click the links below:


-
Fearless Mother's Day Card - Pen & Posh
Leave a comment
Please note, comments must be approved before they are published